Check and configure keypad readings
If your escornabot doesn't work right away after you've uploaded the code and connected the keypad, you should check the values that the Arduino is reading. As you've seen, the keypad consists of a bunch of resistors and buttons connected to the Arduino. Depending on the button you press, more or less resistors will get in the way of the current, and the analog pin will read a different voltage.
2-Wire Keypad (standard)
Connection
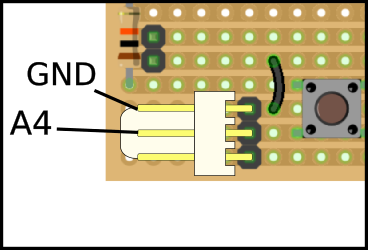
We are going to connect the keypad to the Arduino, as shown below:

As you can see, bottom pin of the connector remains unused, central pin goes to Arduino's A4 pin and top pin goes to Arduino's GND.
Reading the readings
Open Arduino IDE, copy & paste this sketch and upload it.
 #define KEYBOARD_PIN A4
    #define KEYBOARD_WIRES 2 // change to 3 in old buttonsets with 3 wires

    void setup() {
      pinMode(KEYBOARD_PIN, KEYBOARD_WIRES == 2 ? INPUT_PULLUP : INPUT);
      Serial.begin(9600);
    }

    void loop() {
      Serial.println(analogRead(KEYBOARD_PIN));
      delay(200);
    }
Can you see the magnifying glass on the top right corner of the Arduino IDE? If you press it, a window should open showing numbers close to 1024. Every time you push a button, this number should change. Write down the values of each button pressed, each value will be assigned to a particular behaviour of the escornabot.
Modifying escornabot's firmware
Now that you know the values that your keypad gives, we have to put them on our firmware so that the escornabot acts accordingly to each button pressed. We assume you have downloaded the code, open it and look for the folllowing lines in the Configuration.h tab:
 // input values for each key pressed
    #define BS_ANALOG_VALUE_UP 471
    #define BS_ANALOG_VALUE_RIGHT 299
    #define BS_ANALOG_VALUE_DOWN 211
    #define BS_ANALOG_VALUE_LEFT 118
    #define BS_ANALOG_VALUE_GO 158
    #define BS_ANALOG_VALUE_RESET 82
Those are the values that come set by default, so, if they are different to the values you have previously written down, you must change them. For example, if you read 167 when pressing "GO" button, you must put that number instead of "158".
As you can see, firmware is ready for a six button keypad, but you only have 5. You must put BS_ANALOG_VALUE_RESET to "0", as long as you don't have that button.
Now, your escornabot should follow your orders right away!
Three-wire Keypad (Custom)
--ToDo--
